
How to Make a Vehicle Diagnostic Laptop
Horsepower Specs Blog


Horsepower By Drivetrain


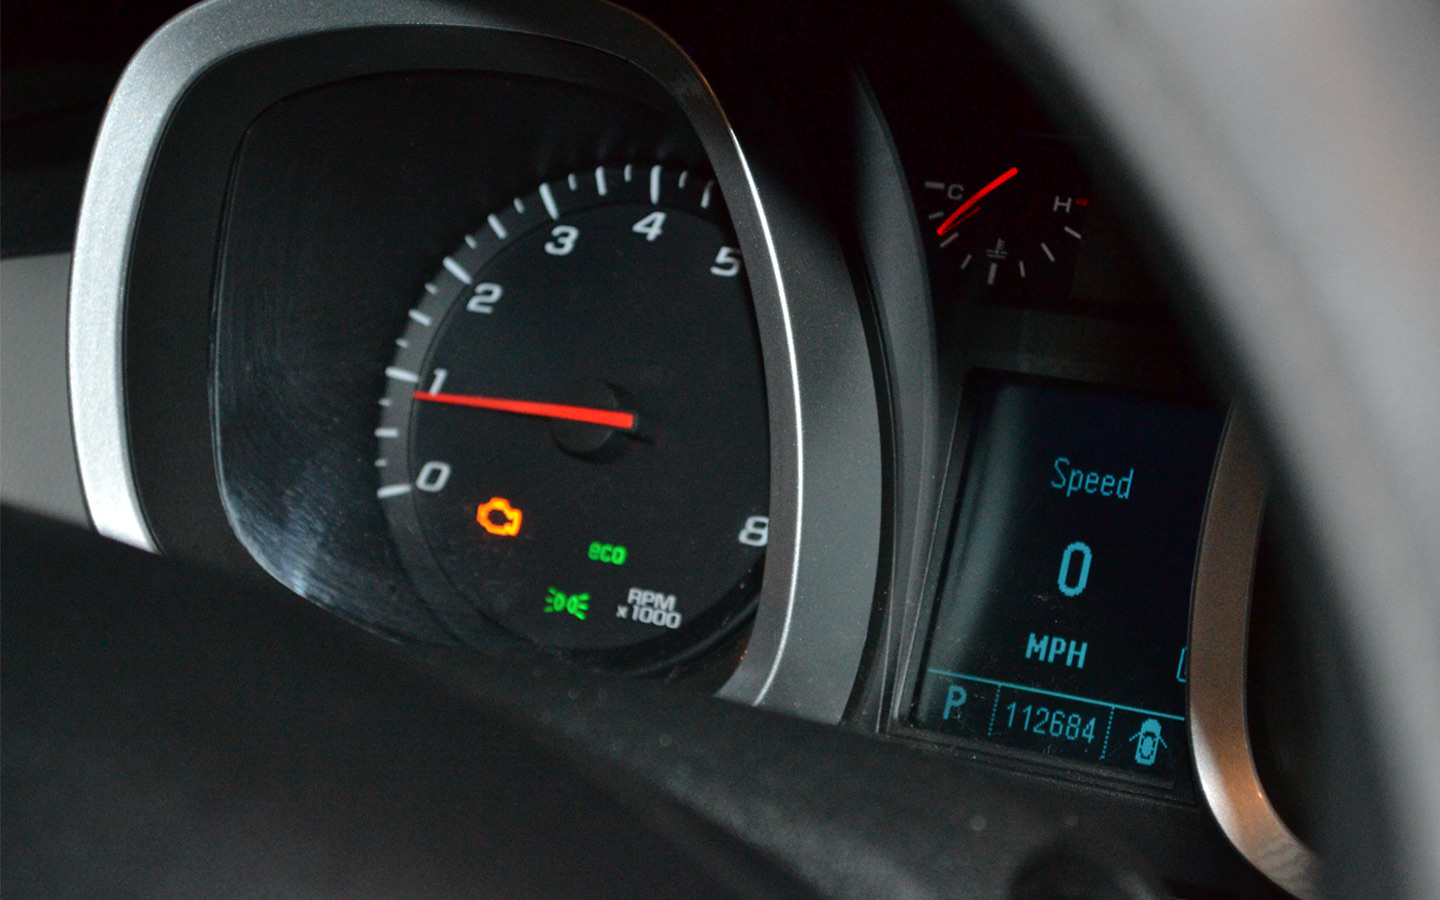
Modern vehicles have a lot of computers and even more sensors. As they age, or due to driving conditions, it can be very common for a “check engine light” to turn on. This means the computers and/or sensors have detected something amiss, but what?
Sure, any halfway decent auto parts store should be able to read the code. That’s great, but not always as convenient as it sounds. You might not be near a parts store, or perhaps they charge for reading codes. Or you might be wondering if the malfunction is severe enough that you shouldn’t be driving the vehicle. In all of these examples, a diagnostic setup on your laptop could save you time, hassle, and cash, and this guide will show you how to build your own.
For this tutorial, we’ll assume you are the absolute beginner and have none of the equipment. If you already have the hardware, skip to about halfway down and we’ll cover software.
Laptops
First, and the most obvious piece, you will need some kind of laptop. You can go out and buy some new Alienware gaming monster, but that is like using a nuke to remove an anthill from your backyard. I’m a fan of overkill, but not when it gets costly. Most diagnostic software has very low hardware requirements, and anything made within the last 10 years should be good to go.
For this example, I went with a Samsung N150 Plus. It was made about 5 years ago, had fairly positive reviews at the time, and like a proper netbook, it’s tiny. Portability is something to think about, as a 17” monitor can be great for viewing, but a 10” is a lot easier to hold for a long period of time, and smaller laptops have massive battery life. The N150 has only a 1.6 GHz, and while it won’t run Crysis 3, it will run diagnostic software just fine. Depreciation hits computers even harder than British cars, so any netbook should run you about $50 in solid condition, or about $100 if you want a case and other extras. EBay is a great source.

If you already have a laptop you are willing to toss into the garage, great, skip tot the next step: Cables. If you just bought a used laptop, keep reading. With all the scammers and software vulnerabilities out there, it is best to be 100% safe with your computer. If you bought this used, even from a reputable seller, it’s best to wipe the hard drive and start over. Just in case you ever decide to check your bank account, or use your credit card to purchase an item, a completely empty and refreshed hard drive offers a lot of peace of mind.
For the n00b, I recommend Darik’s Boot and Nuke, available for free at dban.org. Save any important documents, files, or naked selfies to a separate drive, then install the software on a reboot. It takes about an hour, but will wipe the drive so clean, even the NSA won’t be able to pull anything from it (maybe). Install your operating system of choice just by leaving them in the CD/DVD drive on boot up, and let it do it all automatically. If you don’t feel the need to nuke your hard drive, just insert the operating system disc and let it boot, and it will re-install. The great thing about older computers and simple software is that if you only have an old copy of Windows Vista laying around, that’s fine; it will run great. Once your laptop is solid, it’s time to find an ALDL cable.
Cables
Just like laptops, there are dozens of cable suppliers out there. Assembly Line Diagnostic Link cables are an industry standard connector created in the early ‘80s to check engine and emissions systems at the factory, and give dealership technicians a way to diagnose problems on ever more complicated cars. This connector on the car would allow communication of trouble codes and errors to the technician’s computer, which could then recommend repairs. At first, it was kind of a manufacturer free for all, until SAE and CARB got involved, and made a standardized car computer connection port in the mid-1990s.
There are two types of ALDL ports, and thus two types of cables based on OBD (On-board Diagnostics) I and II. Cars made from about 1980 until about 1995-ish are OBD I, and cars made from 1996 on are OBD II. There is some ambiguity there, as some manufacturers adopted OBD II standardizations before 1996. All this means to you is; if your car is 1996 or newer, it needs an OBD II cable, and they are all the same. If you need an OBD I cable, they can be very different, depending on manufacturer.
Most chain auto parts stores sell ALDL cables and/or software for diagnosing a check engine light. Unfortunately, they seem to be living in the pre-eBay and Amazon world, so expect to pay about $100 for a cable and CD of software. This isn’t a bad way to go, as you would be able to easily return the item if there is an issue, but there are cheaper routes.
Check Amazon, eBay, or your favorite mass market online retailer for an ALDL cable. It doesn’t have to be fancy, it just needs the proper OBD connection at one end, and a USB connection at the other. Older style cables might have a serial connection, but don’t buy that unless your laptop is 10+ years old. USB is smaller and faster. While you can spend over $100, quality cables go for $20 – 30 all the time, so stick with that range. The cheap $5 cables from China are garbage, and have about a 50% connection failure rate. Not good.
Software
While looking at cables, you may have noticed that some of the $25+ cables include a CD of software. That’s fine if you want to go with a package deal, just realize that most of this software is limited, and it might not be exactly what you need. To give you an idea, I purchased one of these cable/software packages, and will provide pics and feedback below.
If you bought only the cable, and want specific software, there are a ton of options for you to look over. Here’s a few:
http://www.palmerperformance.com/
http://www.ttspowersystems.com/
If you clicked all the links, you probably noticed a wide disparity in price and capabilities. Some are professional grade programs with proprietary hardware that run a couple grand. Others are free home-made downloads for specific manufacturers. The in-betweens are small companies providing OBD II software that should work for most people.
For most users, expect to pay between $30 to $50 for software and a cable. The software should have good reviews, and be able to explain in plain language what the code means. Rather than “9017” and leaving you to look up the error, it should display something like “9017, misfire on cylinder 5.” The rest of the features are up to you. Some will offer fancy graphics that simulate dashboard gauges. Cool, but not necessary. Some will log your data files, some will perform a simulated emissions test, while others have Bluetooth connectivity. Really, all you need it to do is read the code, and then be able to clear it. If it can do that, and is the price you want to pay, buy it.
I went with TrueScan from ScanTool, as it was the highest seller from Amazon at the time, it’s stupid cheap but offers a nice looking interface, and has solid reviews. It includes cable and software, and I’ve rebuilt the laptop above, so let’s put them all together.
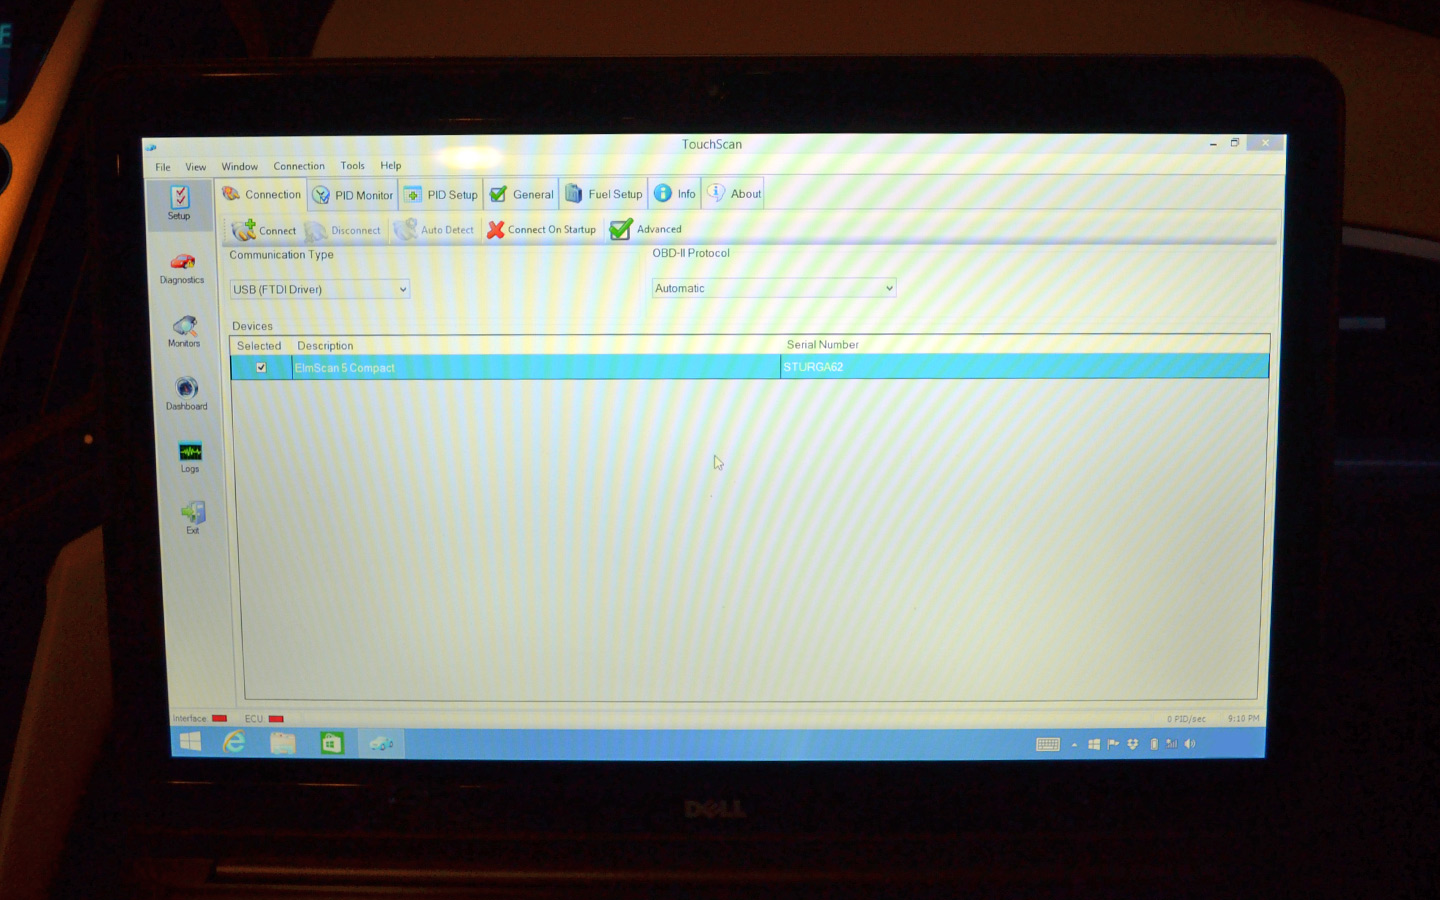
Install the software. Pretty much self-explanatory, as this involves inserting the CD and clicking “run.” Let it do the rest. Save to a location you will remember, and/or leave an icon on the desktop.
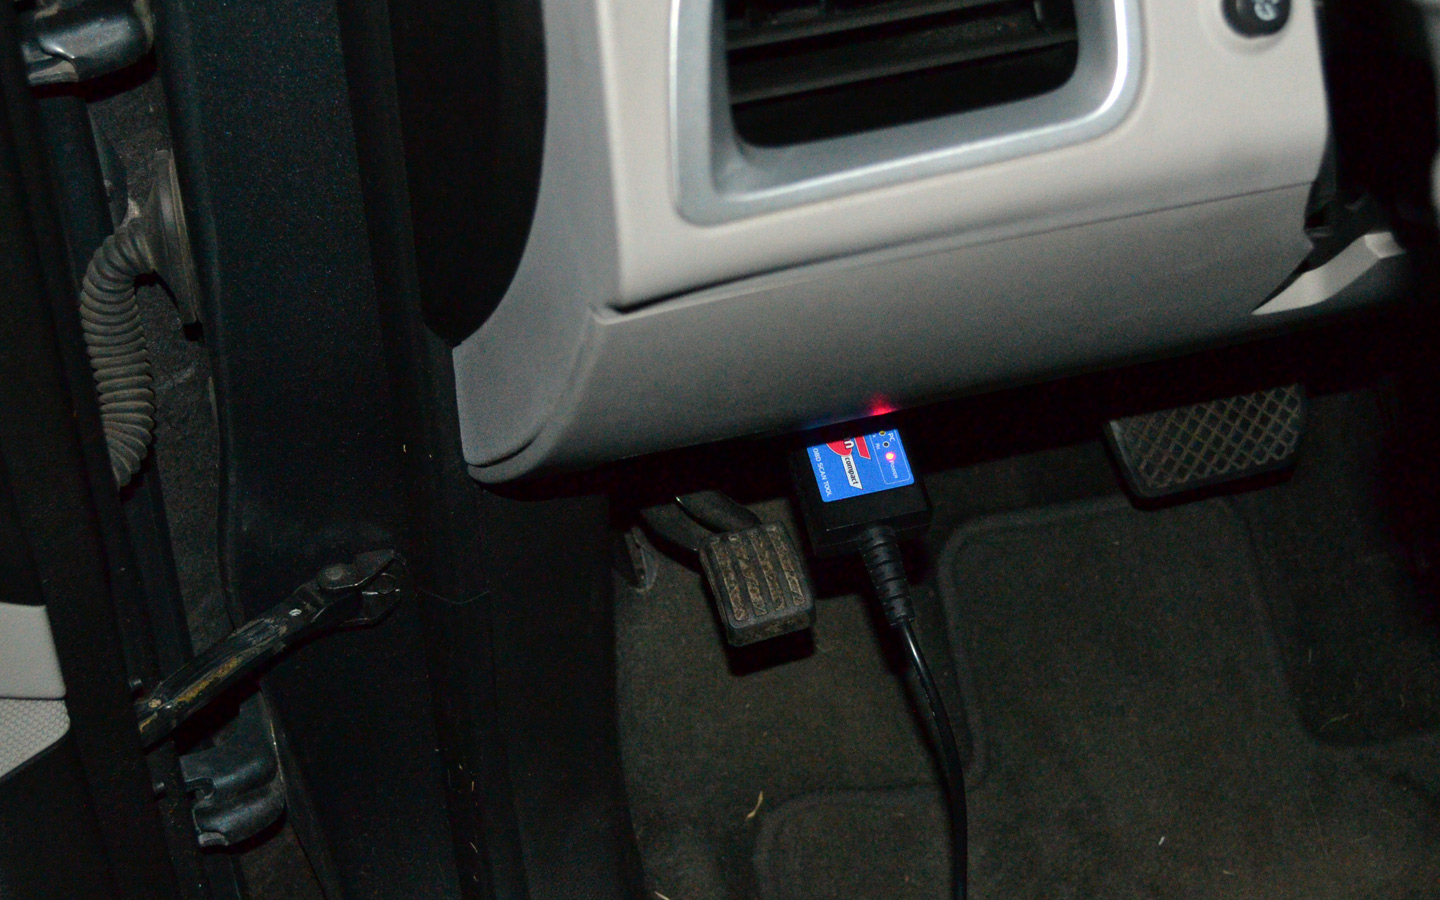
Connect the USB cable to the computer.
Connect the cable to the diagnostic port on your vehicle. Hopefully your cable is more than a couple feet long, that way it’s not awkward to use the laptop in the vehicle.

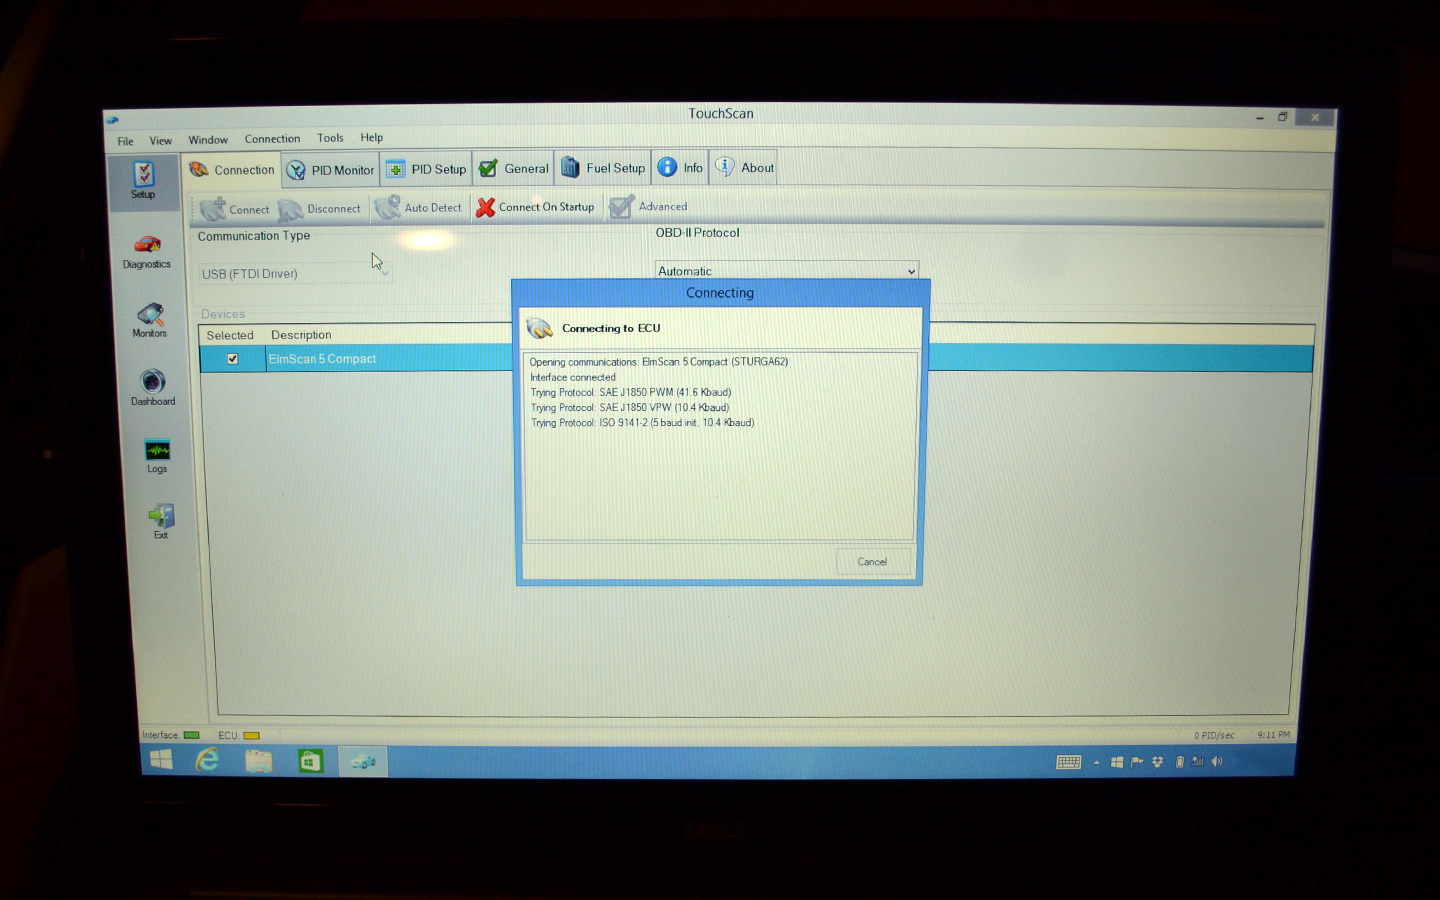
Out of gear and with the parking brake on, turn the engine on, and let it idle. Open the software and click connect. You will a loading screen, but be patient. If you look closely, it’s using slow “baud” rates, so give it a minute. Once connected, any codes will likely be on the first screen.
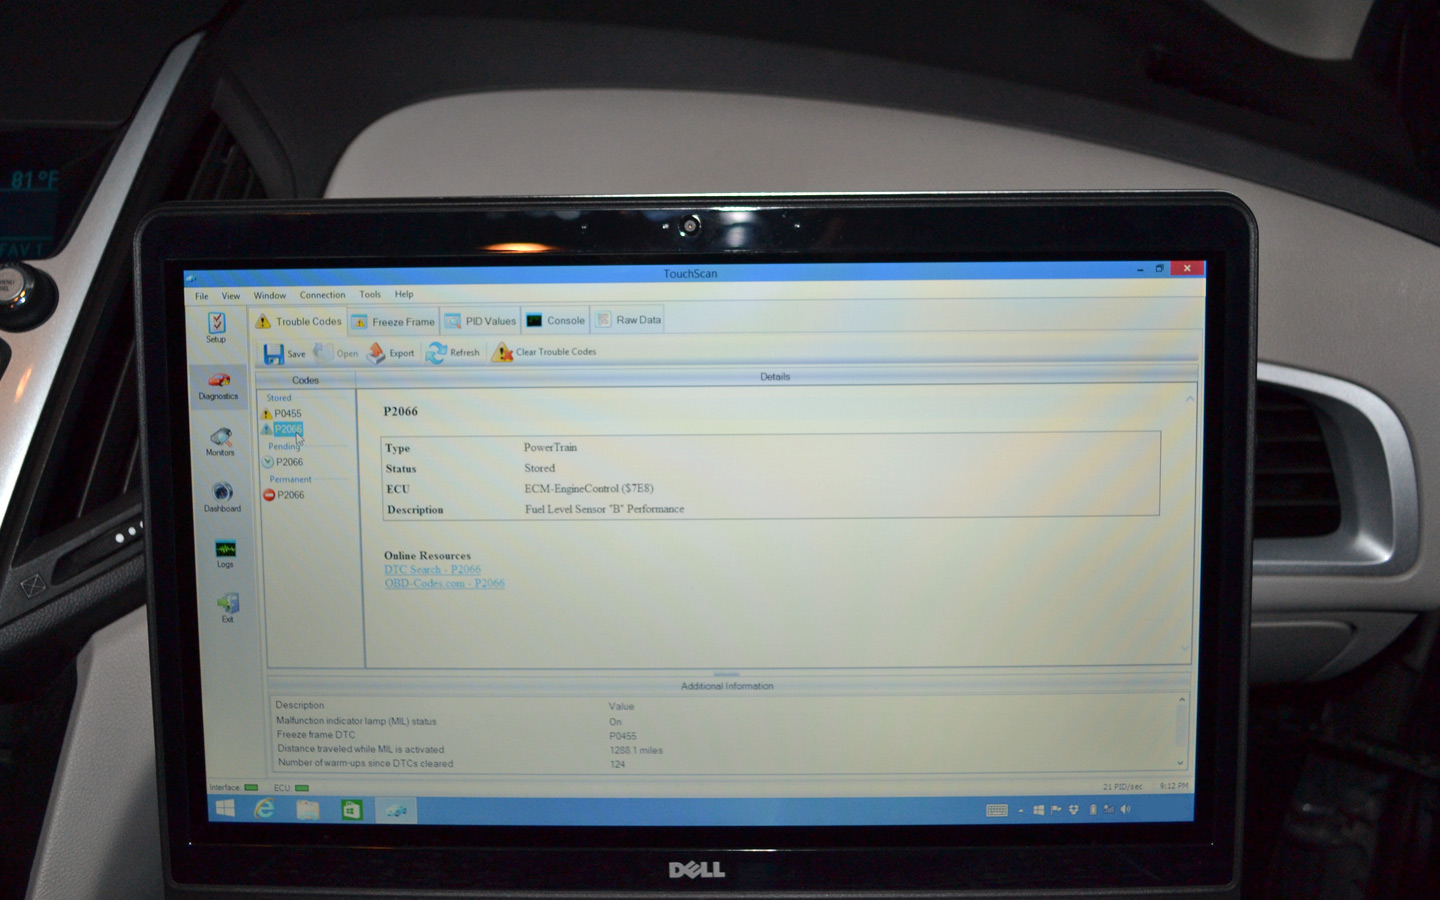
You can find out exactly what that code means and replace the recommended parts, or just hit “clear codes,” and the software will reset the CEL light. If the condition persists, the light will not go out, and you will still receive the CEL code. In this case, replace the sensor or whatever is causing the malfunction light, and clear it with your software. The light will go out without you needing to visit the dealer.
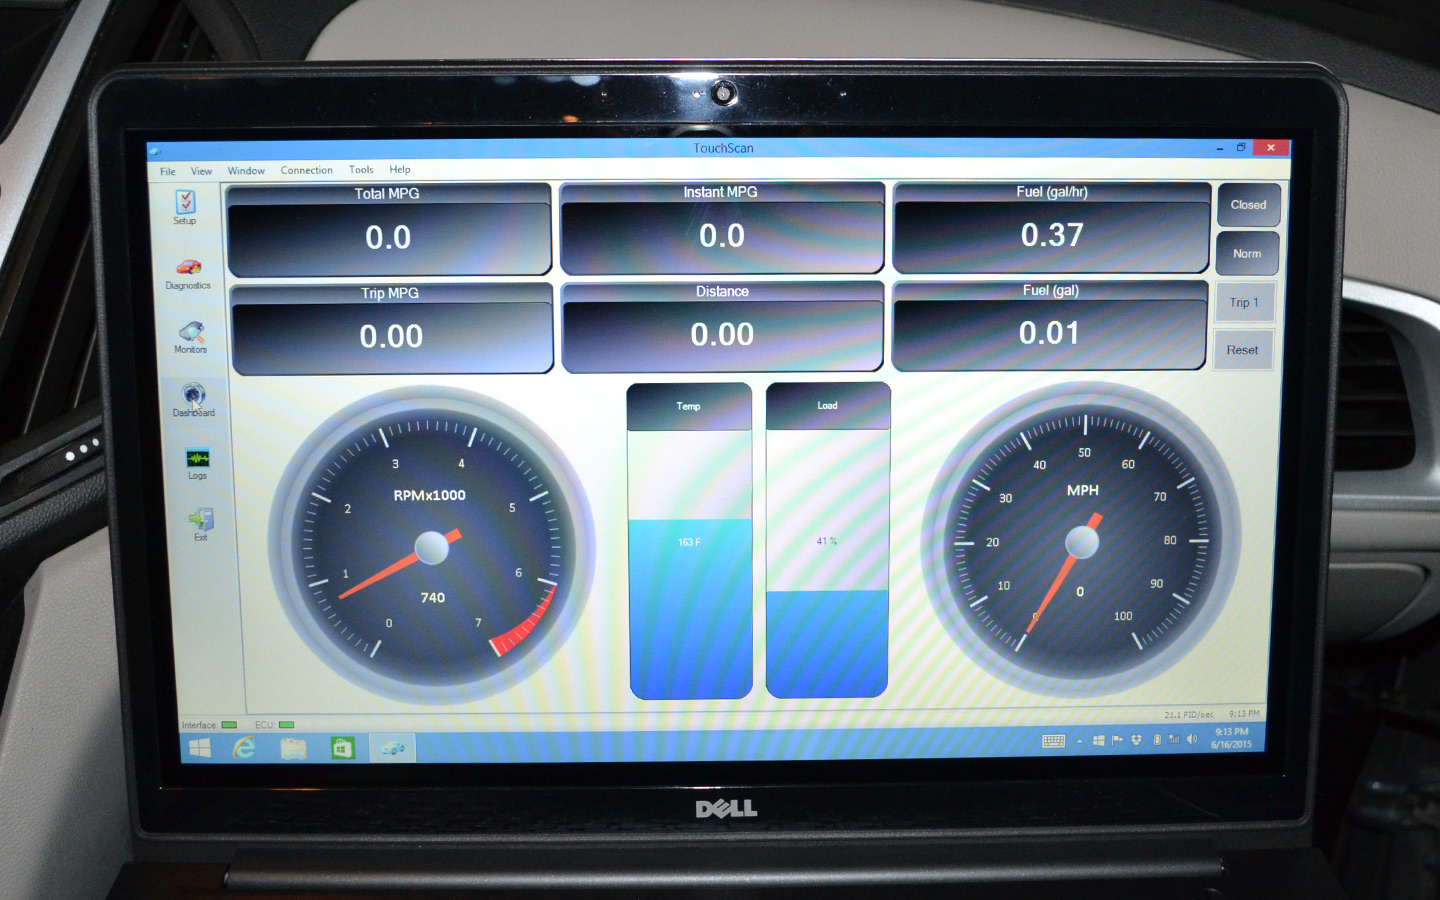
In addition to clearing codes, diagnostic software offers a ton of information.
Dashboard-like gauges provide a detailed look at rpm, engine load, and instant mpg.
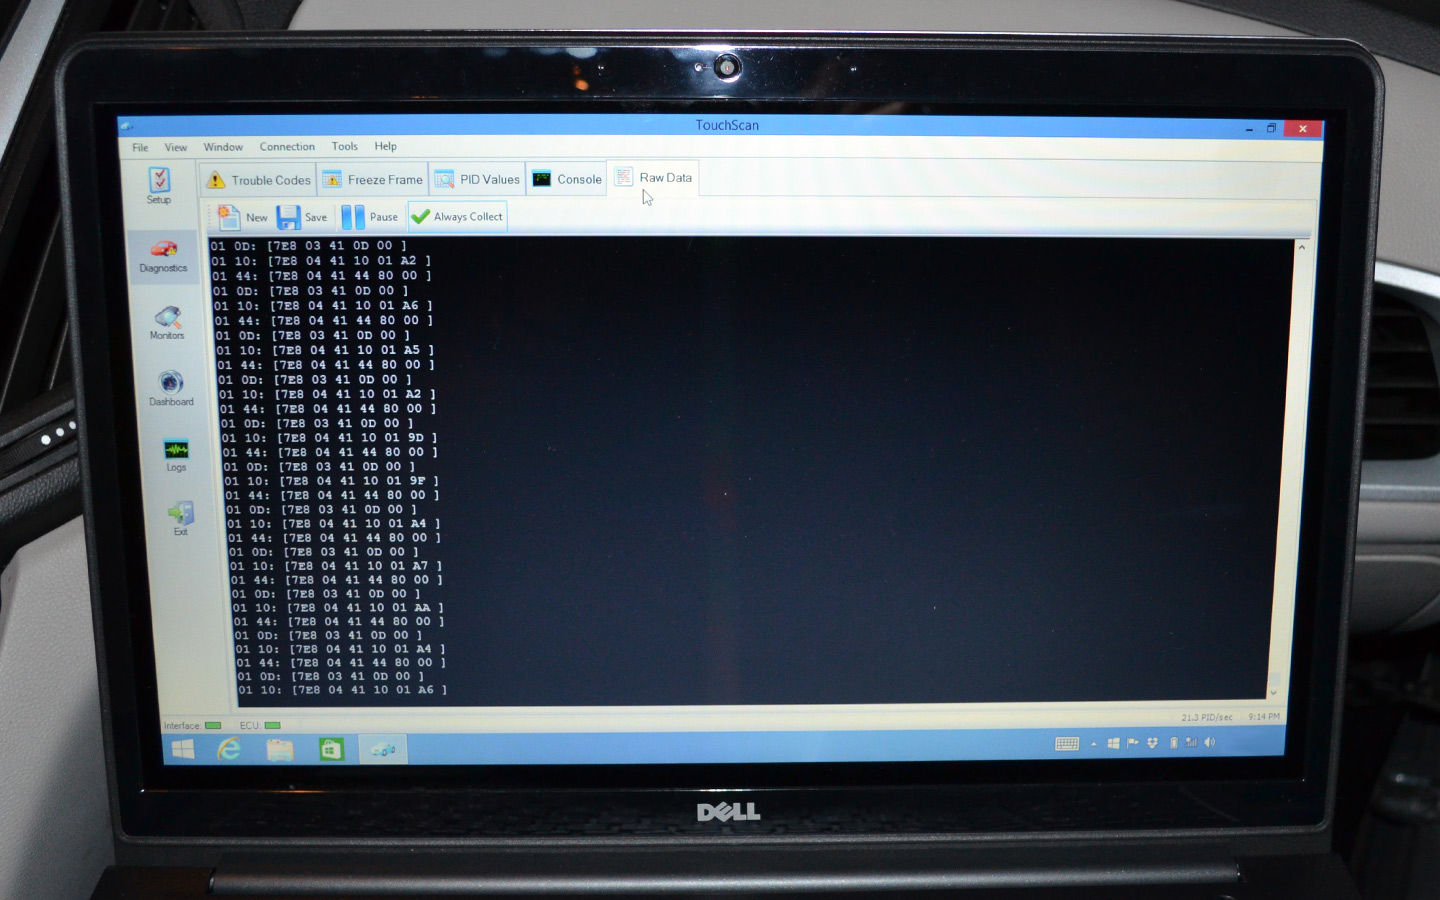
Raw data looks like it’s straight out of The Matrix, a vertically flowing stream of gibberish information. This is the code that the engine’s computer speaks, and can be the key for tuning modifications. Let’s skip it for now though.
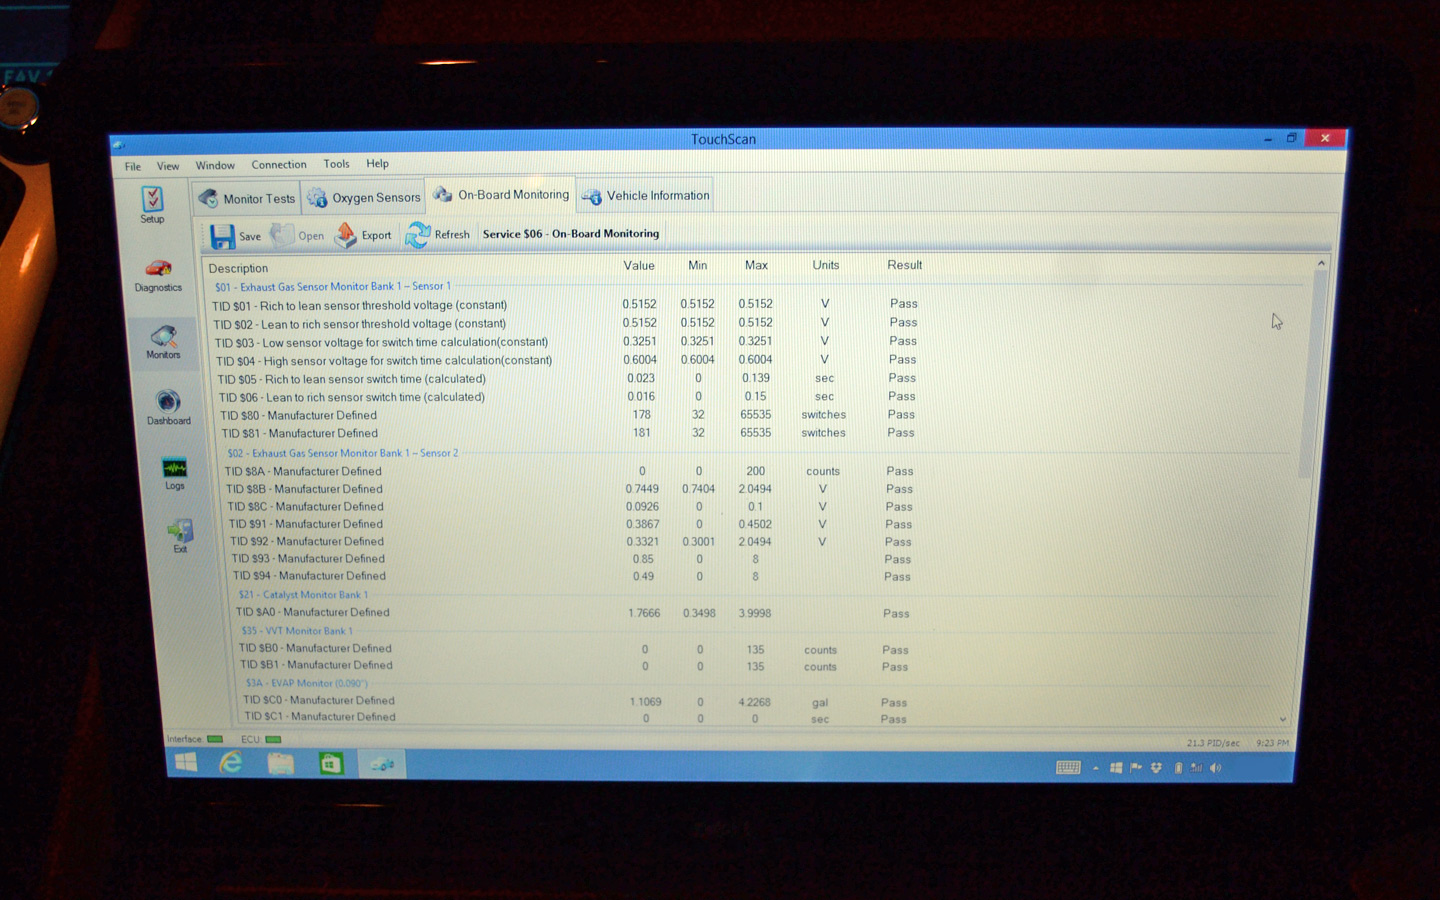
A simulated emissions test runs through all of your vehicle’s equipment to see if it would pass an emissions test. TrueScan told us this Chevy Equinox would fail an emissions test, but also informed us that it is not altogether a serious issue yet. There are no misfires and the gas mileage is right where it should be. Yes, the emissions issue should be resolved as soon as possible, but the software let us know that it won’t destroy the engine if we need to drive it to the mechanic. That kind of information and peace of mind is totally worth the $25 entry cost for diagnostic software.
Add A Comment


Popular Car Articles More Car Articles


Popular Car Videos View All Car Videos

Ambulance Driving Challenge

Modified 2015 Subaru WRX ...

Bentley Mulsanne Speed Driven

2015 Honda CBR1000RR SP ...

Lamborghini Aventador ...

1978 Ford Mustang II King Cobra

Street Racing Turbo ...


